Excel formulas can enhance the functionality and capabilities of Word documents. For example, because of Word’s limited mathematical capabilities, if we need to perform calculations in a Word document, we can use Excel formulas to do so.
This tutorial shows five techniques for using Excel formulas in Word documents.
How to Use Excel Formulas in Word Documents
We cannot use Excel formulas directly in Word documents, but we can use some workarounds to achieve a similar effect:
Method #1: Use Copy and Paste Special Method
If you already have data in Excel containing the formula(s) you want to use, you can copy and paste it into a Word document.
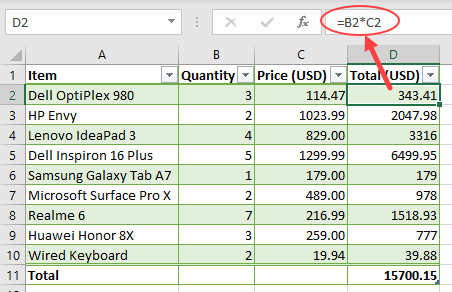
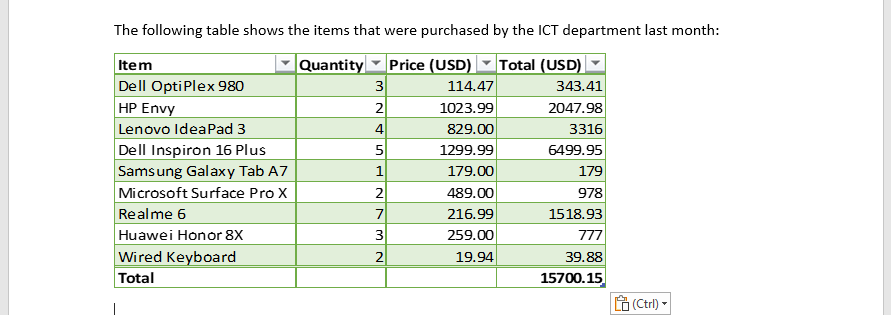
Let’s consider the following Excel table with a formula in column D:
We use the below steps to copy the Excel dataset and paste it into a Word document:
- Select the data in Excel and press Ctrl + C to copy it to the Windows clipboard as in the example below:
Notice the “marching ants” border around the copied dataset, indicating that the data is on the clipboard and is available for pasting.
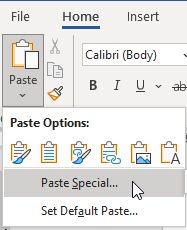
- Open the Word document into which you want to paste the data and click Home >> Clipboard >> Paste >> Paste Special.
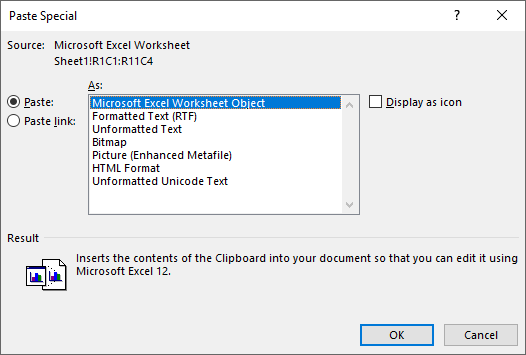
- On the Paste Special dialog box, select Paste As Microsoft Excel Worksheet Object and click OK.
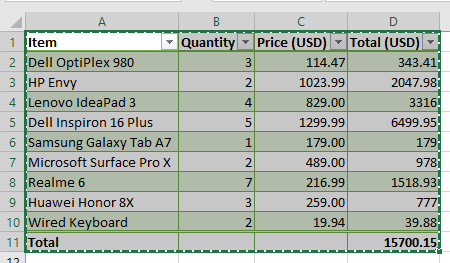
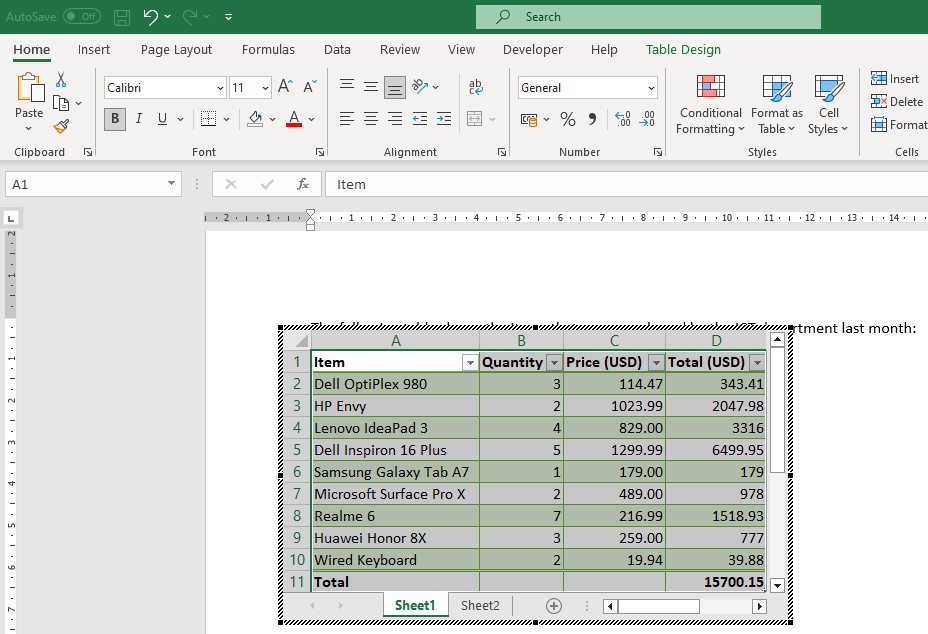
The dataset is inserted into the Word document.
Note that the dataset contains formulas; you can edit it using Excel. To make edits, double-click the dataset, and it will open in a separate Excel window, as seen below:
Once the dataset opens in the Excel window, we can edit the dataset using Excel’s full functionality, including entering data, modifying formulas, and applying formatting to cells.
Once you have finished editing the dataset in Excel, save and close the Excel window to return to the Word document. The changes you made in Excel will be reflected in the embedded object in Word.
It is important to note that if you still need to install Excel on your computer or have an older version of Excel incompatible with the embedded object in Word, you may be unable to edit the object by double-clicking on it. In this case, you may need to edit the object directly within Word or upgrade your Excel software.
Method #2: Create a Table in Word and then Use Formulas
You can create a table in Word and then use Excel formulas such as SUM, AVERAGE, and COUNT to calculate values within the table.
We use the following steps:
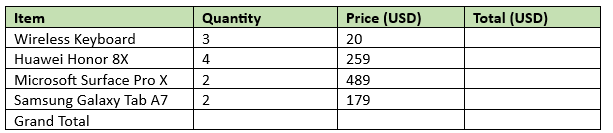
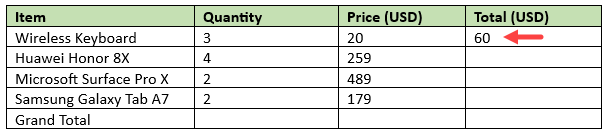
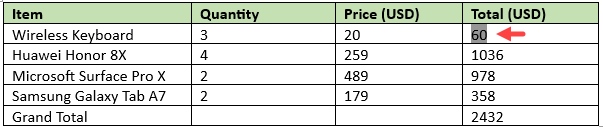
- Insert a table in your Word document and populate it with data as in the example below:
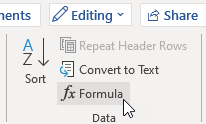
- Click on the cell where you want to use a formula and click Layout >> Data >> Formula.

In this example, we click in the cell immediately below the Total (USD) header.
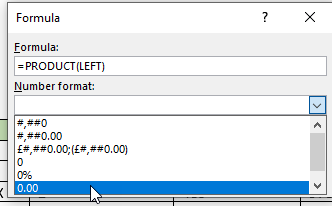
- On the Formula dialog box that appears, delete whatever is on the Formula box except for the equals (=) sign, open the Paste function drop-down, and choose PRODUCT.

- The PRODUCT function with empty parentheses appears on the Formula box. Type “LEFT” in the empty parentheses and click OK.
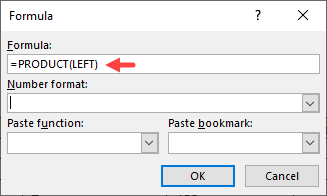
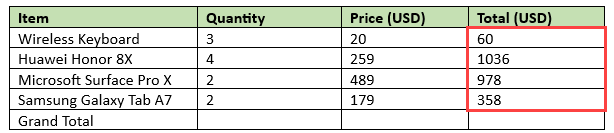
The PRODUCT function returns the product of the two numbers on its left.
- Repeat steps 2-4 for the other cells in the column except for the last cell.
- Click on the last cell in the column and click Layout >> Data >> Formula.

- On the Formula dialog box, ensure the formula on the Formula box is “=SUM(ABOVE)” and click OK.
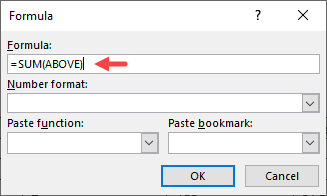
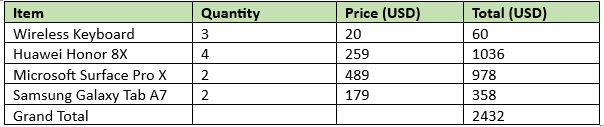
The =SUM(ABOVE) formula adds all the values in the cells above it to return the total.
Add Number Formats
You can add a number format to a number in the table by selecting the number, opening the Number format drop-down, and choosing a number format. For example, to add two decimal places to the first number in the Total (USD) column, do the following:
- Select the number.
- Click Layout >> Layout >> Formula.
- Open the Number format drop-down and choose the 0.00 option and click OK.
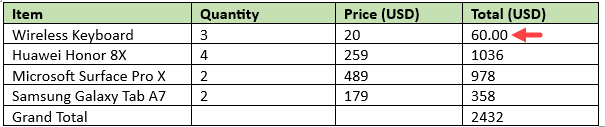
The number format is applied to the number:
- Repeat the previous three steps for the other values.
Note: Unlike Excel tables, Word tables do not have the Fill Handle feature to copy formulas down columns, or across rows, so we have to enter formulas in each cell.
Updating Formulas in Word
Word does not automatically recalculate formulas like Excel. However, the formula results are updated once you close and re-open a Word document.
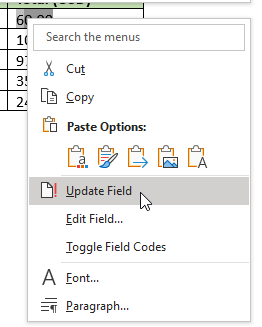
If you want to update the formula results as you work, you must select the value (not the cell), right-click it and choose Update Field on the shortcut menu.
Cell References in Word
We must know how to reference cells to use Excel formulas effectively in Word.
We can use the following techniques to reference cells in a Word document:
Way #1: Use the RnCn Convention
The RnCn referencing method allows you to reference a column, row, or a particular cell in a table. The Rn represents the nth row, while the Cn indicates the nth column. So, for example, to refer to the seventh column and fourth row, you’d use R4C7.
To select a range of cells, for example, the first ten cells of the eighth row, you would use R8C1:R8C10. To select an entire row, for example, the tenth row, use R10, and to select an entire column, the ninth column, use C9.
Way #2: Use the A1 Excel References
In the A1 convention, the letter represents the column, and the number represents the row. For example, B25 refers to the twenty-fifth row of the second column.
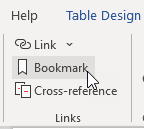
Way #3: Bookmark Names
This method is similar to the use of named ranges in Excel. To give a cell a bookmark name, for example, “total_cells,” use the following steps:
- Select the cell and click Insert >> Links >> Bookmark.
- On the Bookmark dialog box, type the name on the Bookmark name box and click the Add button. The name should not have spaces.
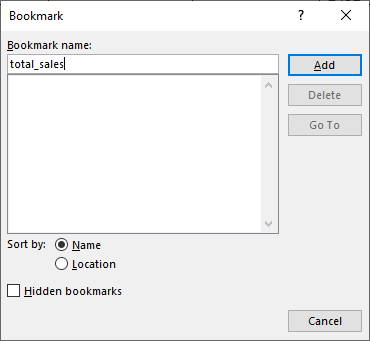
Henceforth you can refer to the cell by its bookmark name. For example, to round the total sales figure to two decimal places, we would use the formula “ROUND(total_sales,2).”
Conclusion
This formula showed two techniques for using Excel formulas in Word documents. We hope you found the tutorial helpful.