With VBA, you can always create a code that will automatically do certain actions, write something in your sheet, create another sheet or chart, populate some cells immediately, and so on. But we can also use it to delete things, just as we used it for creation.
One of the things we can use VBA for is to clear ranges in Excel. In the example below, we will show how to do it and what are the variations of it.
Clear Range in Excel VBA
The first thing we need to do is to populate a certain range in our sheet. To display various options for clearing the ranges, we will create three different ranges:
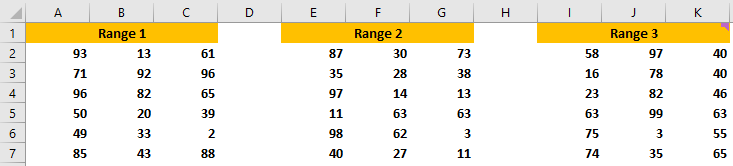
As seen, all three ranges presented in the picture above are basically the same. The only difference is noticeable in range number 3, where we have one comment (marked in Excel with a purple triangle in the upper right corner of the cell).
For the first thing, we will erase the range number one and will clear all the formats as well: bolded cells, Range 1 word is merged and centered and in yellow.
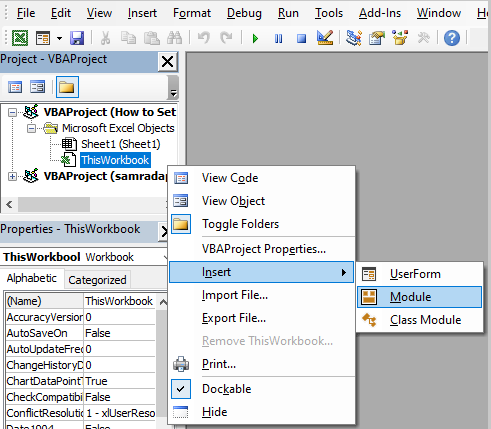
To do this, we need to go to the VBA editor. In order to do so, we press ALT + F11 on our keyboard. After that, on the window that appears, we will right-click on the left window and choose Insert >> Module:
Once clicked, we will be presented with the clear text field, in which we will insert the first code:
|
1 2 3 |
Sub Range1_Cleared() Range("A1:C7").Clear End Sub |
This is what our code looks like in the editor:
When we execute our code by pressing F5 on our keyboard, we will notice that the range A1:C7 will be completely erased and that the format will be erased as well: no bold, and cells A1:C3 are not merged and centered as well:
For the next thing, we will clear the content of range 2 but will keep the formats of these cells. To do so, we will write the following code:
|
1 2 3 |
Sub Range2_Cleared() Range("E1:G7").ClearContents End Sub |
This is what our code looks like in the editor:
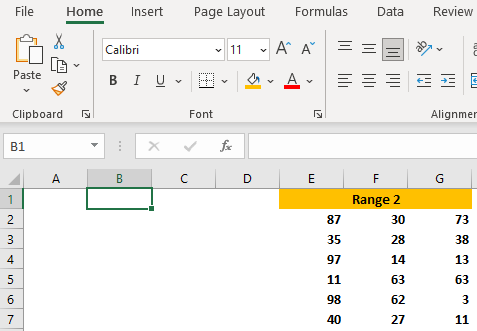
When we execute this code, we will notice that only the numbers and text were cleared, but not the formatting itself:
We can notice that cell E1 is still merged and centered and that cells E1:G1 are bolded and colored in orange.
So the option ClearContents simply erases only the content itself, but not the formatting.
The easiest way in which you could find out about all the clearing options in the VBA, is to press CTRL + SPACE right after we define our range and we insert a dot:
With this, we will be able to see IntelliSense. This is a great way in which VBA can complete our sentences, and we can scroll down to see all the options available. Once we get to the Clear option, we will see other options at our disposal. For this exercise, we will show ClearComments as well, so we will choose that one for range 3:
|
1 2 3 |
Sub Range3_Cleared() Range("I1:K7").ClearComments End Sub |
And in the editor:
When we execute this code, we will notice that the comments have been cleared from Range 3:
And we no longer have a purple triangle appearing in the upper right corner, which is exactly what this code was supposed to do.