All Office programs (Excel, PowerPoint, Word, etc.) have a similar way of functioning in the background. They can all be controlled with VBA as their background program.
Similarities do not come to an end there. Excel, for example, just like Word, has a header and footer. In the example below, we will show how to insert a header based on cell value in our sheet.
Header Based on Cell Value
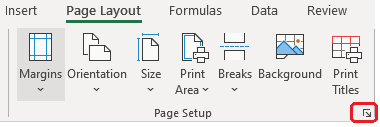
To define the header and footer in Excel, we need to go to the Page Layout tab, then go to Page Setup:
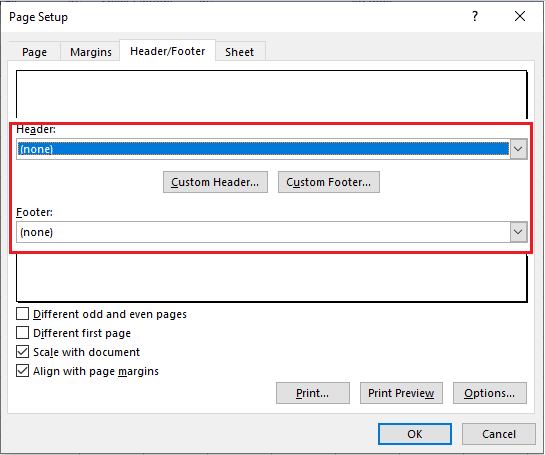
When we click on it, on a window that appears, we will go to the Header/Footer tab. There, we can choose a Header of Footer from a dropdown menu, or we can click Custom Header or Custom Footer.
However, it is very difficult to connect a certain cell value to a Header and Footer like this. To do that, we need to call for help from VBA.
There are two ways to do so: 1) Through the module; 2) Through the code in the Worksheet:
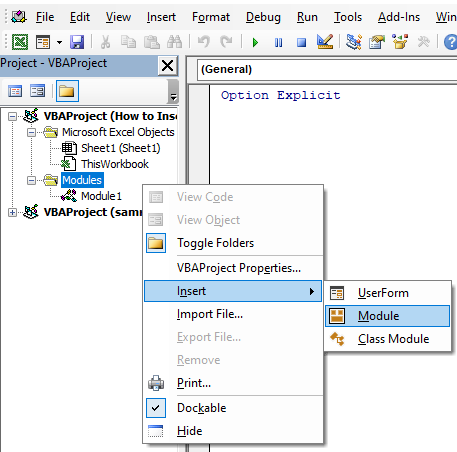
- To define the code in the module, we will open the VBA by pressing ALT + F11 on our keyboard, and then right-click on the left window, and choose Insert >> Module:
Then we need to type in the following code:
|
1 2 3 4 5 6 |
Sub CellValueInHeader() Dim rng As Range Set rng = Application.Selection Set rng = Application.InputBox("Select a cell", "CellValueInHeader", rng.Address, Type:=8) Application.ActiveSheet.PageSetup.LeftHeader = rng.Value End Sub |
With this code, we first declare the variable, and then we set it to be any value in our selection (Workbook):
|
1 2 |
Dim rng As Range Set rng = Application.Selection |
Then we set this variable to be equal to the cell that we choose, i.e. any cell that we click on or type in:
|
1 |
Set rng = Application.InputBox("Select a cell", "CellValueInHeader", rng.Address, Type:=8) |
For the last part, we set our left header to be equal to the value of our choosing:
|
1 |
Application.ActiveSheet.PageSetup.LeftHeader = rng.Value |
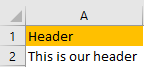
Now let us suppose that we have the following text in cells A1 and A2:
Now we will run the code by going into it and clicking F5. This is the first window that pops up:
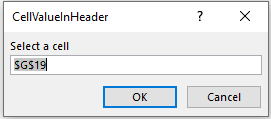
We will choose cell A2 as our header and click OK.
After we do that, we will not see our Header in the worksheet, as we would see in Word, for example. To see the Header, we will go to the File tab, and choose Print, or insert CTRL + P combination on our keyboard, to get the Print Preview window:

You can see the header above the two cells that we populated.
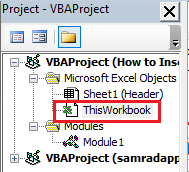
- We can also write our code on the Workbook level as well. To do that, we will go to the VBA, and choose ThisWorkbook on the left side of our window:
In the window that appears on the right side, we will choose Workbook, and the BeforePrint option, and then insert the following code:
|
1 2 3 4 5 6 |
Private Sub Workbook_BeforePrint(Cancel As Boolean) Dim ws As Worksheet For Each ws In Me.Worksheets ws.PageSetup.LeftHeader = ws.Range("a3").Value Next ws End Sub |
And this is what it looks like in the module:

This code first defines the ws variable as Worksheet. Then we use For Next Loop to define that every sheet in our workbook has a header that will be equal to the value of cell A3. We will insert the text in cell A3 which will be: “This will be our new header”.
When we go to Print Preview now, by clicking CTRL + P, this is what we will be able to see:

The difference of this code is that it is being run automatically, meaning that the code will be executed just before the print of the file.