If you ever worked with VBA, you could probably be in a situation where your code is not as fast as you would want it to be. There are a couple of things that you can do to speed it up a little bit.
In the example below, we will show how to speed up the code by turning the screen updating off in VBA.
Turn Screen Updating On and Off
Screen updating can be turned on or off through the VBA module. In simple terms, it has to be done at the application level. We are going to use the following sentence:
|
1 2 |
Application.ScreenUpdating = False (turning it off) Application.ScreenUpdating = True (turning it on) |
We will show its importance in one example. To do this, we need to open the Excel file, click on ALT + F11, and then right-click on the left window that appears, go to Insert >> Module:
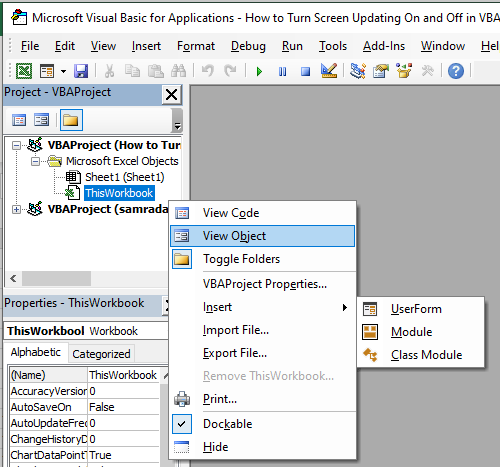
When a new window appears in which we should write our code, we can start with it.
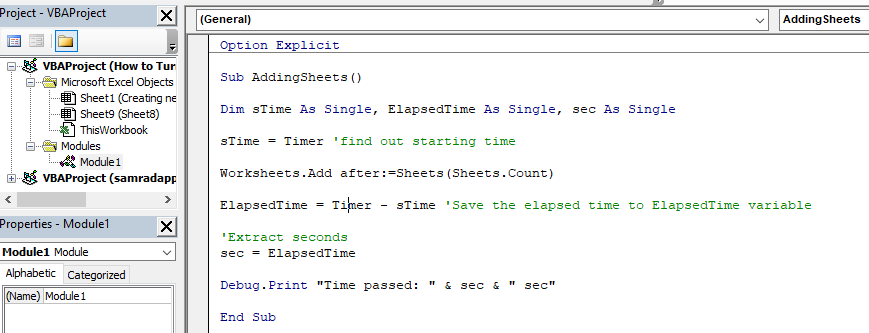
This is what our code will look like:
|
1 2 3 4 5 6 7 8 9 10 |
Sub AddingSheets() Application.ScreenUpdating = FALSE Dim sTime As Single, ElapsedTime As Single, sec As Single sTime = Timer 'find out starting time Worksheets.Add after:=Sheets(Sheets.Count) ElapsedTime = Timer - sTime 'Save the elapsed time to ElapsedTime variable 'Extract seconds sec = ElapsedTime Debug.Print "Time passed: " & sec & " sec" End Sub |
This is what our code looks like in the module itself:
This code first declares variables that we going to use, and then it sets variable sTime to be equal to the Timer:
|
1 2 |
Dim sTime As Single, ElapsedTime As Single, sec As Single sTime = Timer |
Then we need concrete action. In our case, our action is to add a worksheet at the end of our workbooks, i.e. after the end of our sheets list.
After that, we calculate ElapsedTime as the difference between the Timer and start time, and we store that number in the ElapsedTime variable.
|
1 2 |
Worksheets.Add after:=Sheets(Sheets.Count) ElapsedTime = Timer - sTime |
For the next part, we want to extract seconds from our variable, so we do just that by setting the sec variable to be equal to ElapsedTime.
|
1 |
sec = ElapsedTime |
Now, for the final part, we will use the Debug.Print option to show us the time that it took for our sheet to be created:
|
1 |
Debug.Print "Time passed: " & sec & " sec" |
Now, Debug.Print option is great for us because it will give us the information that we need (the time spent creating a sheet) without having to store this information in a variable or without showing it in a message box.
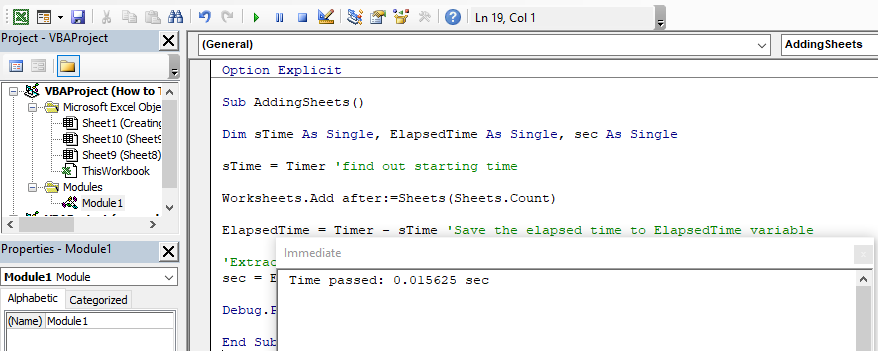
To use Debug.Print option, we need to turn on the Immediate window. We will do it by going to the View tab in our Module and choosing the Immediate window, or simply clicking CTRL + G:

With this window visible, we will execute our code (by going into the code and clicking F5) and we will see the message in our Immediate window:
Time passed: 0.015625 seconds
Or in our Module:
We will also have a new sheet created, as defined in our code.
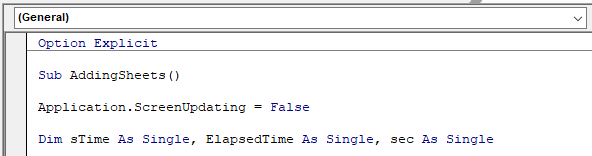
To speed up the execution of our code, we will simply add an Application.ScreenUpdating = False above our code and beneath the part where we defined subroutine (Sub….):
Now, when we execute our code again, these are the results that we will get:
Time passed: 0.0078125 seconds
Or in the module:

To turn on the screen updating again, we just need to insert:
|
1 |
Application.ScreenUpdating = True |
You will notice that our code is executed so much faster without screen updating. Although it is a matter of seconds in our case that is only because we defined such a small portion of code (sheet to be added) to be executed. Just imagine how much time can you spare when it comes to more complex code.