With the Cells property, you can reference any object inside a worksheet, where you can make changes or retrieve the value.
This is a somewhat confusing subject. It may seem that Cells is an object, but it’s really not. There is no Cells object in the Excel Object Model. So in order to refer to the specific cells, you can either use the Cells property or the Range property. Each of these objects returns the Range model.
The main difference between the Range and Cells properties is that with the first one you can refer to one or multiple cells, and with the Cells to only a single cell.
The Cell property takes one or two parameters. The first one is the row number, and the second one is the column number. If the property takes only one parameter, it represents the column number.
|
1 2 |
Cells(row, column) Cells(column) |
Let’s take a look at the following example.
|
1 2 |
Cells.Item(3, 4).Value = 1 Cells.Item(5).Value = 2 |
Item and Value are the default properties, so you can drop it. This code works exactly the same as the one below. It’s also cleaner and more readable.
|
1 2 |
Cells(3, 4) = 1 Cells(5) = 2 |
The first line of this code insert 1 into cell D3 (third row and fourth column), and the second line into cell E1.

You can use Cells with the following objects:
- Application
- Worksheet
- Range
The first two return the same result. The last one may return a different result.
Let me explain using the following example. All these lines of code insert 1 into cell B1.
|
1 2 3 4 5 |
Application.Cells(1, 2) = 1 Sheet1.Cells(1, 2) = 1 Worksheets("Sheet1").Cells(1, 2) = 1 Cells(1, 2) = 1 Range("A1").Cells(1, 2) = 1 |
Note, that the second line is a Sheet name, which, in my case is “Sheet1”. The last line with Range also works because the numbering starts from A1, and this is the only situation when the result is the same.
Let’s take a look at a few additional examples.
|
1 2 |
Range("B2:C5").Cells = 5 Range("B2:C5") = 5 |
is the same as
|
1 |
Range(Cells(2,2), Cells(5,3)) = 5 |
You can also combine both.
|
1 2 3 4 |
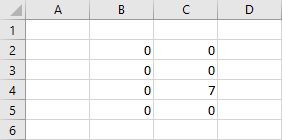
Sub CellsRanges() Range("B2:C5") = 0 Range("B2:C5").Cells(3, 2) = 7 End Sub |
First, this code inserts 0 into the B2:C5 range, and then it moves to the third row and second column, from cells B2.

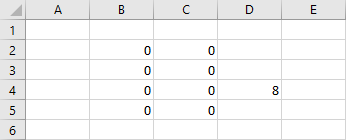
If you insert a column or row number that is outside the selected range, it will be displayed outside.
|
1 2 3 4 |
Sub CellsRanges() Range("B2:C5") = 0 Range("B2:C5").Cells(3, 3) = 8 End Sub |

Looping
The Cells property is especially useful when you need to use numeric values as parameters, for example when you have to loop through rows and columns.
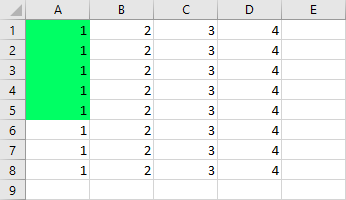
This example uses only range to color the first 5 cells in column A.
|
1 2 3 |
For i = 1 To 5 Range("A" & CStr(i)). Interior.Color = RGB(0, 255, 100) Next i |

When using the Cells property, the code becomes more readable.
|
1 2 3 |
For i = 1 To 5 Cells(i, 1).Interior.Color = RGB(0, 255, 100) Next i |
It’s also easy if you want to use a column consisting of two or more letters because the second argument can also take column numbers in the form of letters.
|
1 2 3 |
For i = 1 To 5 Cells(i, "A").Interior.Color = RGB(0, 255, 100) Next i |
But instead of coloring cells in a single column, let’s change colors in a single row. This time instead of numbers, we have to deal with letters. You can do it using both methods, but with the range method, you would have to create a function to convert column numbers to their representation in letters.
I created such a function in this lesson.
It’s much easier to use the Cells property instead. Only a slight modification is required to convert this example. Just switch parameters.
|
1 2 3 |
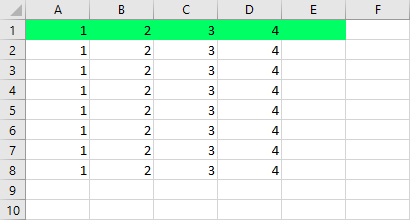
For i = 1 To 5 Cells(1, i).Interior.Color = RGB(0, 255, 100) Next i |
This loop will color the first 5 cells in the first row.

